
Deck Plans – Definition, Drawings, DIY & Free Options
Ever tried explaining your dream deck without a drawing? Suddenly everyone’s imagining a different patio. That’s where a deck plan saves the day – the visual roadmap that turns “I


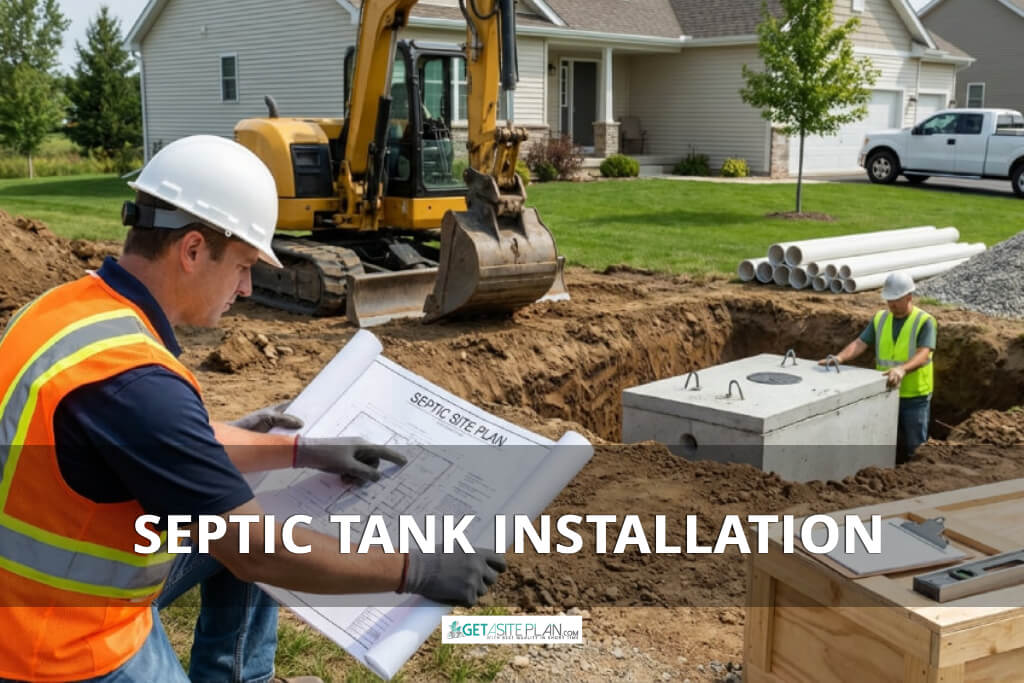

Whether you’re building on a rural lot or replacing a failing system, septic tank installation is one of the most regulated, and most consequential projects a homeowner can take on.
Get the sequence right, and your system gets approved, installed, and working without delays. Miss a step (skip the permit, overlook the site plan, choose the wrong system for your soil) and you’re looking at costly setbacks before a single shovel hits the ground.
This guide walks you through everything: system types, permits, installation steps, costs, and maintenance. In the right order.
A septic permit site plan is one of the first documents your county will require, and one of the most overlooked steps that delays the entire project.

Septic tank installation isn’t a single task – it’s a sequence. And the order matters more than most homeowners expect.
Here’s how the process of tank installation flows from start to finish:
Each step depends on the one before it. Skipping or rushing any phase, especially the permit and site plan stage, is the most common reason projects get delayed or stopped entirely.
The video below walks through the entire process before we get into the details later in the text:
The first major decision you’ll face is choosing the right type of septic system, and that choice depends entirely on your soil, your lot, and your local regulations.

Before diving into septic tank installation, let’s get more familiar with septic tank characteristics and role.
A septic tank is an underground wastewater treatment system used on properties that aren’t connected to a municipal sewer line. It collects all wastewater from the home – toilets, sinks, showers, and appliances and treats it on-site before releasing it back into the ground. According to the EPA, one in five U.S. households relies on a septic system, most of them in rural and semi-rural areas [1].
Wastewater flows from the house into the tank, where it separates into three layers:
Bacteria inside the tank continuously break down the solid waste, but sludge accumulates over time, which is why regular pumping every 3–5 years is essential.

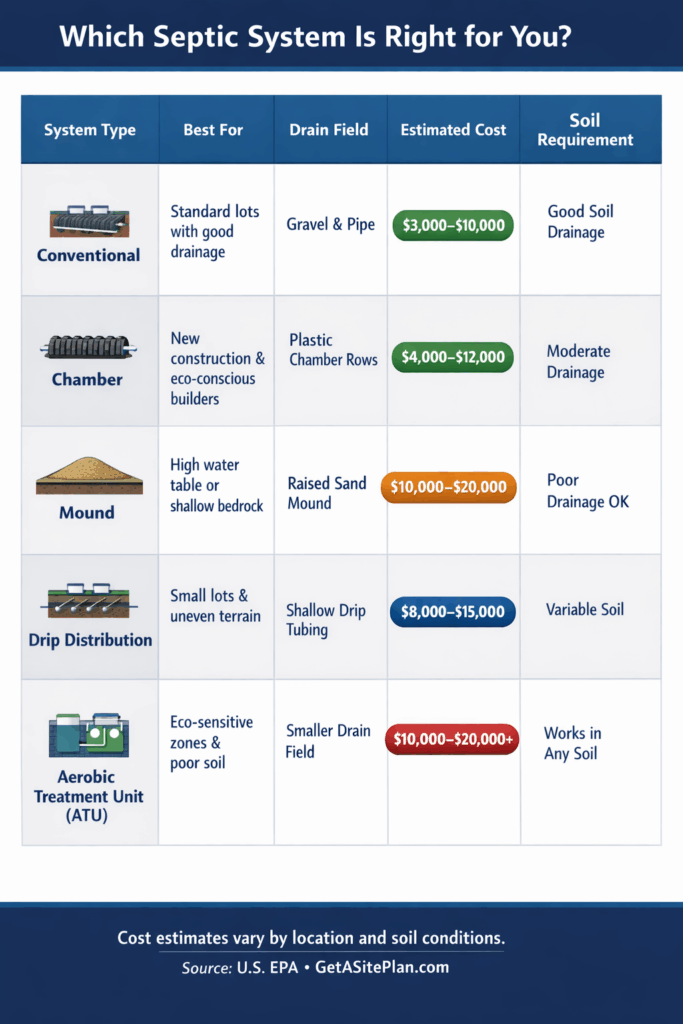
The type of septic system you install depends on your soil conditions, lot size, water table depth, and what your local health department will approve.
Here are the five most common types of septic systems:
Aerobic Treatment Unit (ATU) – Uses oxygen to accelerate wastewater breakdown, producing a higher quality effluent. More expensive than conventional systems, but necessary for environmentally sensitive areas or poor soil conditions.
Once you know which system fits your property, the next step is making sure you have everything in place before installation can legally begin.

Before any excavation begins, several key requirements must be in place. Skipping this stage is the most common, and most expensive mistake homeowners make.
Here’s what you’ll need for septic tank installation:
Here’s a quick checklist to keep your pre-installation process on track:


In most states, yes. Installing a septic system without a licensed contractor is illegal in the majority of U.S. jurisdictions. Where homeowner exemptions do exist, the permit, soil test, and final inspection requirements still apply in full.
Working without proper licensing and permits can result in fines, mandatory system removal at your expense, and serious complications when selling the property.
Once you have a clear picture of what’s required, the next step most homeowners underestimate is getting the site plan done, and done on time.

Before your county approves a septic permit, they’ll typically require a site plan – a bird’s-eye drawing of your property showing the proposed septic system location, drain field placement, and setback distances from the house, property lines, wells, and any water sources.
This document isn’t optional. Without it, your permit application won’t move forward and neither will your installation.What most homeowners don’t realize is how time-sensitive this step is.
Local engineers and surveyors often have weeks-long backlogs, and that wait pushes back everything else: the permit, the soil test scheduling, the contractor – the entire project.
GetASitePlan delivers professional, permit-ready septic site plans fast – accepted by counties across the U.S. and designed specifically for the permitting process.

With your permits and site plan in order, you’re ready for the part most people actually came here for – the installation itself.

Installing a septic system is a multi-phase process that involves licensed professionals, heavy machinery, and local inspectors. While most homeowners won’t be doing the physical work themselves, understanding each step helps you manage the project, ask the right questions, and avoid costly surprises.
Here are the 8 steps for installing a septic tank:
Let’s see each step in detail.

Before anything goes in the ground, a licensed professional conducts a percolation test, a standardized measure of how quickly your soil absorbs water. The results determine which system type your property can support, how large the drain field needs to be, and how deep the excavation will go.
This step cannot be skipped or self-performed in most jurisdictions. Plan for 1-3 days for the test itself, plus additional time for results and review.
With soil test results in hand, your licensed contractor will help you select the right system for your property. The decision factors in soil absorption rate, lot size, water table depth, household size, and local regulatory requirements.
If you haven’t reviewed the system types yet, refer back to the comparison section above.

Submit your permit application to the local health department or county zoning office. Most jurisdictions will require your site plan for permit, soil test results, system design, and contractor credentials before the application moves forward.
Permit approval timelines vary significantly – from two weeks in straightforward cases to eight weeks or more in counties with high application volumes. Don’t schedule excavation until you have written approval in hand.

Before any digging begins, call 811, the national dig-safe hotline.
This is a legal requirement across the U.S., not a suggestion. A utility locating service will mark the positions of underground gas, electric, water, and telecommunications lines on your property.
Once utilities are marked, clear the work zone of vegetation and debris, and ensure there’s sufficient access for excavation equipment and delivery vehicles.

With the site prepared and permits approved, excavation begins. Your contractor will dig the main pit for the septic tank – typically between 4 inches and 4 feet deep depending on site conditions and frost line requirements, along with the trenches for the drain field pipes.
Drain field trenches require a precise slope: between 1/8 and 1/4 inch of drop per foot to ensure proper effluent flow. A compacted gravel or sand base is then laid to create a level foundation for the tank and pipes.
Before we move to the actual tank placement, here’s a look at what excavation and installation day typically looks like on the ground:

The tank, most commonly precast concrete, weighing between 8,000 and 10,000 pounds, is lowered into the pit using an excavator or crane. Precise leveling is critical: the inlet side must sit slightly higher than the outlet side to ensure wastewater flows in the right direction.
Before backfilling, the tank is filled with water. This prevents the structure from shifting or floating upward due to soil pressure during burial

The distribution box (D-box) is installed between the tank outlet and the drain field. Its job is to divide effluent evenly across all drain field branches: if one branch receives more flow than others, the entire system becomes unbalanced and fails prematurely.
Perforated pipes are then laid in the gravel-lined trenches. A layer of geotextile fabric is placed over the gravel before final backfill, this prevents soil from migrating into the stone layer and clogging the system over time.

Once all components are connected and verified, the trenches and tank pit are carefully backfilled. Heavy machinery should not pass directly over the tank or drain field during this phase, the weight can crack concrete tanks and compress drain field trenches.
The final step is scheduling your inspection with the local authority. The inspector will verify pipe connections, system leveling, setback compliance, and documentation. Once approved, your septic system is officially live.
Once your system is live, keep these in mind:
Now that you know how the installation process works, the next logical question is: what will it actually cost?

Septic tank installation costs vary widely depending on system type, soil conditions, and location. For a conventional system, most homeowners pay between $3,000 and $10,000.
More complex systems, like mound or aerobic units, can run $20,000 or more.
The biggest variables are labor rates and permit fees, which differ substantially from state to state and county to county.
In some states yes, but most jurisdictions require a licensed contractor for at least the design and inspection phases.
For most properties, a conventional concrete tank is the most reliable and cost-effective option – your soil test results and contractor will guide the final choice.
On level ground, away from tree roots, flood-prone areas, and at the required setback distance from wells, water sources, and property lines.
Fines, mandatory removal at your expense, and complications when selling the property.
Most 1–2 bedroom homes need 750-1,000 gallons; 3-4 bedrooms typically require 1,000-1,250 gallons.

Septic tank installation is a significant project, but with the right preparation, it’s entirely manageable. The key is working in the correct order: permits, site plan, soil test, system selection, installation, inspection.
The step that catches most homeowners off guard is the site plan. It’s required early, it’s time-sensitive, and delays here push back everything else.
The fastest way to move forward is getting your septic permit site plan online, delivered in 24 hours.
Reference:

Ever tried explaining your dream deck without a drawing? Suddenly everyone’s imagining a different patio. That’s where a deck plan saves the day – the visual roadmap that turns “I

A landscape rendering gives you a 3D preview of your garden or yard – a chance to see every angle before any work begins. And it has gone digital. What

Every year, thousands of property owners face costly delays or outright rejections because their subdivision plan requirements weren’t met. From drainage miscalculations to missing zoning data, one overlooked detail can